Raise FSB (front side bus) from 100MHz to 133MHz (Pentium II/III CuMine)
© n3dt.hardwarefiles.com Natural 3D Tech
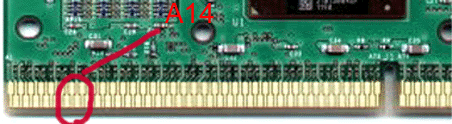
Now here we are again with the same situation. Now we have PentiumIIIs which support the 133mhz bus (PIII 533, 600EB, 667, etc., etc.). So what about someone who owns say a PIII 500 (.18u fab). What do they do is they have one of those motherboards? Well, here's the answer. Pin A14 which is labeled BSEL1 (B21 is labeled BSEL0) is the next step in the line of CPU mods that will get you that extra juice you're looking for from you PentiumIII. Pin A14 can be found on the Left Face side (side with core chip on it, see below). Like that of the B21 pin on the old PentiumIIs, this pin is read either low or high. If it's read low this means that the pin has a 3.3v current placed on it which indicates to the motherboard that this chip is a 100mhz CPU. What need to be done is to cut or block this pin. When cut or blocked then the 3.3v is not read thus sending the pin high. This then tells the system that the CPU is a 133mhz PentiumIII. Taking this into consideration, I decided to give it a try. I cut myself a small thin piece of electrical tape and carefully placed it over pin A14. Then I carefully placed the PentiumIII back into the slot. On the VC820 mobo there is a jumper used to bring up the maintenance menu. I set this jumper then booted the system. First thing I saw let me know I was on the right track. When I used the maintenance menu before I placed the tape over A14 the CPU speed read out was 400mhz. When I entered the menu it gave me the option to change the speed from a low of 300mhz up to 800mhz. After the tape was placed over pin A14 and the system was booted the startup speed would show 533EB and the maintenance menu would give the option to go from 400mhz up to 1066. This told me for sure that the modification worked. So I set my CPU speed to 800mhz, saved, then shut down. After that the speed indicated 800mhz at boot up. So I shut down again, pulled the PentiumIII out and removed the tape (could cause problems if left there). I then got myself an exacto knife and carefully cut the trace leading off of pin A14. Placed the PentiumIII back in the slot and booted. That was it. Head to the next page to see the results for yourself.
For those of you who own the Flip Chip version of the PentiumIII can also do the same modification. Head to the next page and see the pin layout of the Flip Chip to see which pin you need to pull.
Again, for those of you who are not sure of how steady you hand is or how good your eyes are, then you "DON'T" want to do this. This is for all you who are willing to take the chance and are willing to take responsibility for what your doing. Here you can see where I've indicated the pin you need to modify (AJ31). This is the only pin you need to deal with on the Flip Chip PentiumIIIs
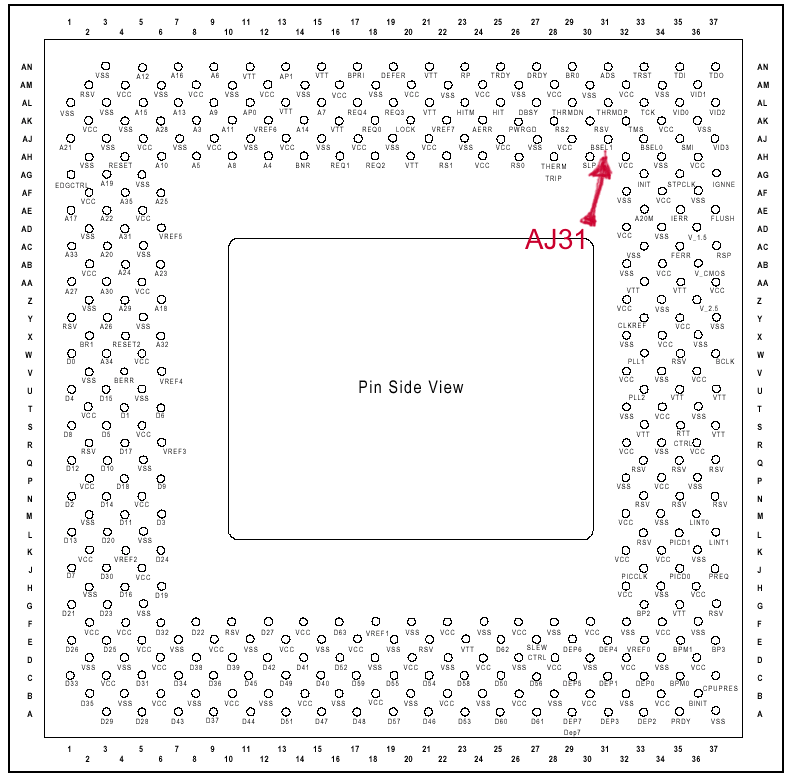
Now, this should be pretty straight forward. What you have to do here is block this pin off. I myself would gently rock the pin back and forth until it breaks off. It's either that or going to the mobo to make the change and that my friend would be a real pain. Remember, this modification as well as the pin A14 modification is for those PentiumIIIs that range up to 600 or 650mhz at the most. When setting the 650 to the 133mhz bus you will be running at 866 which is really pushing it. I myself would not recommend this to anything above 600mhz PentiumIIIs which would give you 800mhz when done. Well, that's it. Hope this helps out some of you hardcore tweakers out there.